
My first raised bed was built out of whatever happened to be leaning against the back of the barn, which is how I learned that a pile of mystery lumber is not a free lunch. The second lesson came when I filled it. I bought bag after bag of garden soil at the farm store, and the receipt for that one box cost more than the boards. The beds I have now are plain, square and a little boring, and I have not filled one from bags since.
Building the frame is an afternoon. Filling it is where the money goes, and where most of the difference in your harvest comes from. Here is how I fill a raised garden bed now, starting with how much you actually need.
How Deep Should a Raised Garden Bed Be?
Shallower than most people think. About 10 to 12 inches of good soil is plenty for most vegetables, as long as the ground underneath is loosened so roots can keep going down. Lettuce, onions and herbs are happy with less.
Go deeper, 18 inches or more, if:
- The ground underneath is hardpan, rock or contaminated soil, so roots cannot go past the bottom of the bed.
- You want long carrots or parsnips and your native soil is heavy clay.
- Your back or knees are the reason for the bed. A taller bed means less bending.
Depth is also where the cost adds up. A 4 by 8 foot bed holds about:
- 6 inches deep: 16 cubic feet
- 12 inches deep: 32 cubic feet, a little over 1 cubic yard
- 18 inches deep: 48 cubic feet
- 24 inches deep: 64 cubic feet, close to 2.5 cubic yards
Bagged soil usually comes in 1 to 2 cubic foot bags, so a single 12-inch bed can take 20 or more bags. That is why the bottom of a deep bed should not be bagged soil at all.
Prepare the Ground Underneath
Skim off the sod, or lay plain cardboard over the grass to smother it. Pull any tape and staples off the cardboard first. Then loosen the soil below with a garden fork so roots can head down into it. If burrowing animals are a problem in your yard, staple hardware cloth across the bottom of the frame before you fill.
How to Layer a Raised Garden Bed
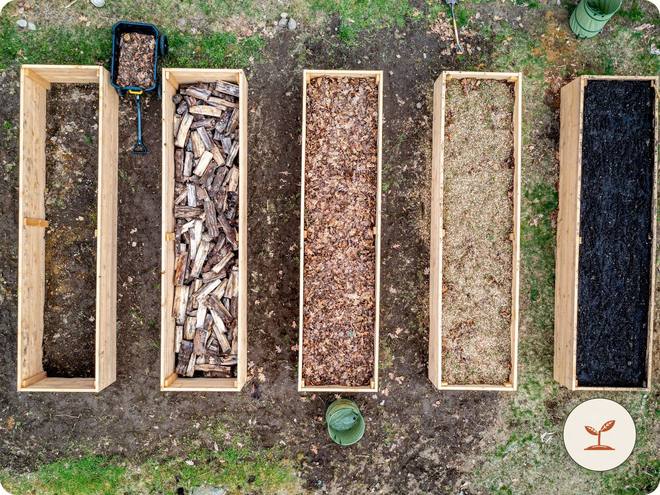
For a shallow bed, skip straight to the soil mix below. For anything deeper than about 12 inches, I fill the bottom with free material from around the property and save the good soil for the top. From the bottom up:
1. Cardboard
One layer, overlapped, to smother grass and weeds. It breaks down within a season.
2. Logs and branches (deep beds only)
Old logs, thick branches and rotting wood take up a lot of space and hold moisture as they break down. This is the same idea as hugelkultur, just in a box. Keep this layer at the very bottom and well below where roots will grow, because rotting wood ties up nitrogen while it decays. Skip black walnut, which is hard on many vegetables, and anything painted or treated.
3. Leaves, straw and grass clippings
Shredded fall leaves, old straw and clippings fill the middle. Pack them down and wet them as you go, because they shrink a lot. Only use clippings from a lawn that has not been sprayed with weed killer.
4. Compost
A few inches of rough or half-finished compost on top of the leaves feeds the layers below and starts them breaking down.
5. Soil mix for the top 8 to 12 inches
This is the part the plants actually live in, so this is where to spend. I go with roughly two parts topsoil to one part compost and do not fuss much beyond that.
One warning about free material. Hay, straw and manure can carry long-lasting weed killers from the field they came from, and those can stunt tomatoes, beans and peppers for a year or more. If you are bringing it in from a farm, ask what the field was sprayed with. If nobody knows, leave it out of the vegetable beds.
Buying Soil: Bags or Bulk
If you are filling one small bed, bags are easy. For two or more beds, a bulk delivery of a topsoil and compost blend by the cubic yard is usually far cheaper, even with the delivery fee. Ask the supplier what is in the blend, and look at it before it gets dumped in your driveway. It should be dark and crumbly, not sticky clay or mostly sand.
Straight potting mix is not worth it for a big bed. It is expensive, it is light enough to dry out fast, and it settles badly.
Fill It Right to the Top
Fill a little past the top edge and water each layer as you go. Everything settles over the first few weeks, a layered bed more than most, and a bed that starts full ends up at the right level. It is fine to plant straight away; just keep an eye on how the level drops.
A Word on the Bed Itself
I build mine about 4 feet wide, so I can reach the middle from either side without stepping in, and 8 feet long, because lumber comes in 8-foot lengths. Two stacked 2×6 boards make a bed right around 11 inches tall, screwed into 4×4 corner posts. Drill pilot holes near the board ends so the wood does not split.
Use rot-resistant wood that has not been chemically treated. Cedar is the usual choice and lasts for years. Plain untreated pine is cheap and safe but rots within a handful of seasons. Keep old railroad ties, which were treated with creosote, and any wood of unknown treatment out of a vegetable garden. Leave at least 2 feet between beds, closer to 3 if you want to push a wheelbarrow through.
Water and Top It Up
Raised beds drain well, which is part of their appeal, but it also means they dry out sooner than ground-level rows. Water deeply and less often, so roots grow down instead of staying near the surface. A soaker hose or drip line laid along the rows puts water at the soil instead of on the leaves. A layer of straw over the surface keeps the moisture in through the dry stretches of July.
Each spring the soil will have sunk as the compost and the layers underneath break down. I top my beds off with a few inches of fresh compost in April, before anything gets planted.